Hello friends, I am back from the break due to exams and as I promised here comes an article under the series Design Ogbonge Blog blogger template. Today´s tutorial will take you through designing blogger header, background and also be removing the Navbar. You can follow the entire series below.
Ogbonge Template Series
Design Blogger Header, Background, Remove Navbar - OgbongeBlog Style
How To Style Blogger Blog Header Image
Now you have successfully created an image for your blog, which you wish to use as your header image. Next step is to upload it to blogger and also give it some CSS styling so you can attain the exact same pattern of OgbongeBlog.
Since my text blog is named after Jide´s tech blog, I have decided to use the exact same header image that he is using on his blog. I have downloaded the image, now it´s time to upload it. Should in case you have any problems with designing the header image, I suggest you make use of any of the following tools.
- Adobe Photoshop
- Corel Draw
- Paint
- Microsoft PowerPoint
- Any other great photo designing software.
Upload Blog Header Image
If you are used to the Blogspot platform, then this should not be a problem but since this post is for both pro and beginners, let me guide you through the process.
Log on to your blogger account >> Locate and clink the Layout tag in the menu list where you can also find "Post", "Settings" etc.
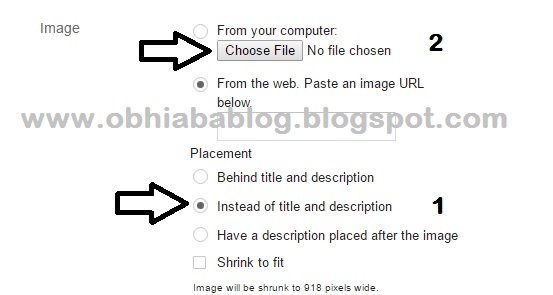
Now you see should see a box titled "Header" as shown in the image above >> Clink "Edit" below the header tag and wait for a pop-up box to come on your screen.
Follow the easy number guide, as shown in the image above. Now simply tick on the " Instead of title and description" >> if you have uploaded the image elsewhere, you can simply paste the URL (of the image) inside the box (From the web. Paste an image URL below.) but if you have the image on your laptop, simply upload it by using 2 (From your computer) as shown.
Let the image you have uploaded load. once it is done, clink on save in the same pop up box and visit your blog to see the new header banner.
Center Blogger Header Image Using CSS
The second part of today´s tutorial is centring the header image we just uploaded. And if you have been following my previous posts of this series, then you should understand what I mean with CSS.
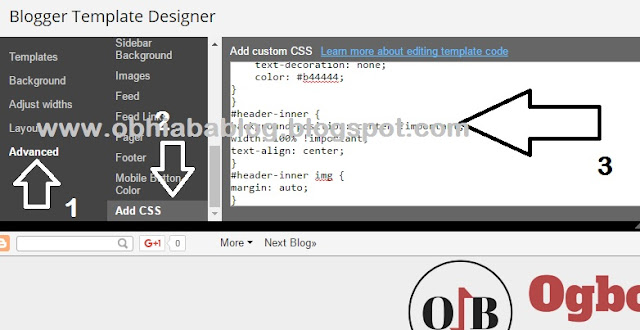
Just as we did before, let's move to the Customize tab which you can find inside the Template section of your dashboard. the explanatory photo below to guide you.
Hopefully, you got it right. Now we are going to add some style to the header. And we already know the class that define our header tags. In case you don´t know, you can easily use Chrome Inspect Tool to check.
Step 1.
Locate the Advanced tab in the menu links.
Step 2.
Scroll down to "ADD CSS"
Note: You will meet some codes inside the box. Now simply scroll to the last line of codes in the box, clink on it and use the Enter key to create space.
Step 3
Copy the code below and simply paste it into the last part of the codes.. after space you earlier created. Once again use the enter key to create space and you should spot the changes in the demo provided below for you.
#header-inner {
background-position: center !important;
width: 100% !important;
text-align: center;
}
#header-inner img {
margin: auto;
}
Step 4
Did you see the changes? if yes simply clink on save shown at the top. But if this method did not work for you, don´t worry, there is an alternative method.
Alternative Method
If you attempted the above method and it did not work for you, without saving.. simply clink on "« Back to Blogger".
You should see a familiar page, now clink on Edit HTML. Then a box should open with pure codes. well do not worry, it is safe to mess around but first, you must back up your template (learn here).
Using CTRL + F search for the below line of code.
]]></b:skin>
You will find it just once. Just above ]]></b:skin> copy and paste the codes below.
#header-inner {
background-position: center !important;
width: 100% !important;
text-align: center;
}
#header-inner img {
margin: auto;
}
Finally, clink on save and you should see the image of your blog, well centred.
Note: This is not found in Ogbonge Blog, therefore I don´t have any preview for it.
How To Center Blogger Header Title And Description
This will guide you on how to centre the header title and also the description of your blog. Doing this is only useful if you did not upload a header image.Note: This is not found in Ogbonge Blog, therefore I don´t have any preview for it.
Step 1.
Locate the add CSS.Step 2.
Copy and paste the below code inside the CSS section.Header h1, .Header .description{
text-align:center;
}
Step 3.
Preview and save your template.How To Add Background Image Using CSS
If you look closely at the two templates; test blog and ogbongeblog, then you will notice the difference in the background. This is because Ogbonge blog has an image on its background while we don´t. so let's add the same image to ours.
Using the same CSS procedure, simply go to your customise tab >> advanced >> add CSS. just the same way you created space using Enter Key, do same and add the below codes, just after every other code inside the box.
body {font: normal normal 13px Arial, Tahoma, Helvetica, FreeSans, sans-serif;color: #444444;background: #eeeeee url(https://blogger.googleusercontent.com/img/b/R29vZ2xl/AVvXsEjImlm5C8s9sBqtOqmt4lcZ1_e4dtNo3B6pImSg-0LNa5ZYnEIVRU9RbBLhURKCWh5EIpWPLgnJ2G77WFDwi1M9UoHJuU7b9xsJz2qrdKv8RPXQTeWxcKzfSHSXLBII8auLEz2cGDHmeQE/s0/grey_sandbag.png) repeat scroll top left;}
Clink enter to create space once again, and then you should see the background showing. In case you want to change the image, simply replace
http://4.bp.blogspot.com/wBvVQTuEK0/VVWsZ2NN_KI/AAAAAAAAME8/pkZVRWCeUno/s0/grey_sandbag.png
with the URL of your uploaded image. Save the template.
Alternative Method
You can also use the alternative method we used earlier on. Just clink on Edit HTML >> search for ]]></b:skin>, now copy and paste the below code, just above ]]></b:skin>.
Hope you are loving the look of your blog already?body {font: normal normal 13px Arial, Tahoma, Helvetica, FreeSans, sans-serif !important;color: #444444;background: #eeeeee url(https://blogger.googleusercontent.com/img/b/R29vZ2xl/AVvXsEjImlm5C8s9sBqtOqmt4lcZ1_e4dtNo3B6pImSg-0LNa5ZYnEIVRU9RbBLhURKCWh5EIpWPLgnJ2G77WFDwi1M9UoHJuU7b9xsJz2qrdKv8RPXQTeWxcKzfSHSXLBII8auLEz2cGDHmeQE/s0/grey_sandbag.png) repeat scroll top left;}
How To Remove Blogger NavBar
What is Blogger NavBar? Is the widget that shows at the very top of your blog page. Though it has a few advantages, most bloggers including ogbonge blog designer do not use it. It makes the blog loose its professional look. So let's turn it off.Step 1.
Locate the layout tab in your blogger dashboard, now clink on it and watch out for a gadget titled "Navbar":Step 2
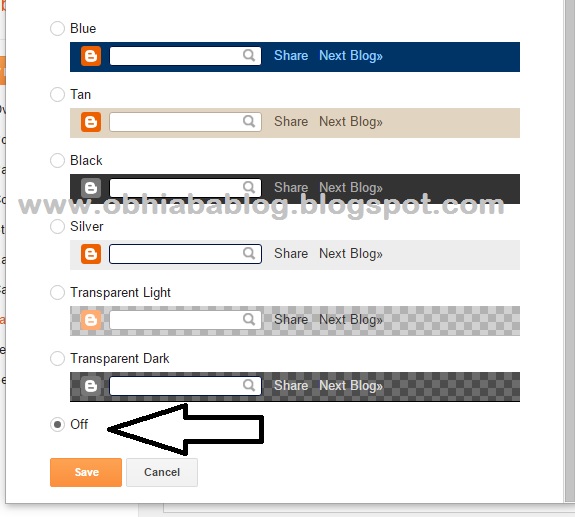
Clink on Edit and watch out for a pop up box. Once it opens, as shown below.Step 3.
Tick on "Off" and save.Visit your blog, and you should notice the difference.
View Our Test Blog - Demo
This is the end of today´s tutorial. And hopefully, i have successfully designed the header image for our blog, remove navbar and also added a beautiful background. Have any questions? feel free to share with me in the comment box. sharing is caring!.


Nice post...
BalasHapusThis is great blog for background remove service. Click here to get best photo editing service. PhotoEditExperts is a great site for background remove service & more.